Without assigned and active working hours, a user cannot draw absence events, record attendance or timetracking.
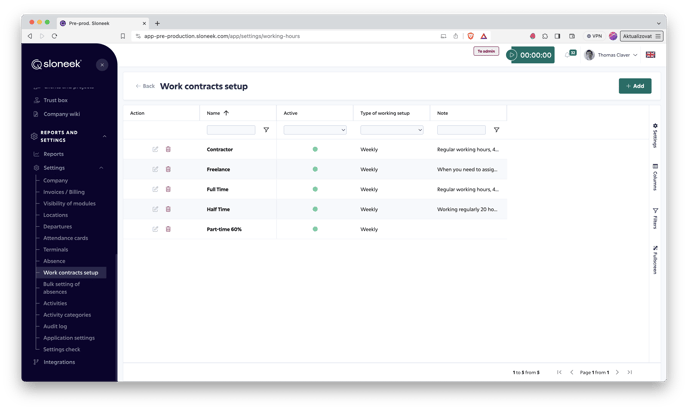
You set the working hours in Settings / Work contracts setup.
Working hours Determines when the employee is scheduled to work. It can be defined either by a recurring weekly cycle which best represents the working hours of traditional office professions working Monday to Friday, or it can be defined for each specific day of the year. This yearly setting is suitable for defining the working time of employees with irregular working hours (e.g. working every Monday every even week) or for employees with very dynamic scheduling (e.g. medical professions).
Setting up the Working hours dial
In the section Settings / Work contracts setup, all available working time dials can be assigned to users. As a first step in configuring the Absence module, it is a good idea to go through the existing dials and possibly create your own if the dials supplied within the application do not suit you:
Click on the pencil icon next to the selected dial or click on the  button to access the edit dial. Both options - creating a new dial or editing an existing one - look practically identical.
The top section of the Working time settings contains the basic settings - name, translations into world languages, switch between active / inactive events (inactive event cannot be drawn), color and type. The lower section is used for editing the working time itself. As we mentioned in the introduction, the Timesheet can be of two types - weekly or annual.
Setting weekly working time
Within it, it is possible to define which days of the week (Monday to Sunday) are considered as working days, as well as specific shift start and break times.
This type of working time is suitable for those employees who come to work regularly, and this regularity can be defined on a weekly cycle. Any other definition of working time requires the use of the second - annual - method.
In the second half of the screen "Setting weekly working hours" is the definition of specific times and working days. This can either be set directly on this screen, but since the table contains about twenty columns, it is more practical to zoom in to the full screen - by clicking on the icon ![]() next to the
next to the  button. Clicking this button allows you to work on a large desktop.
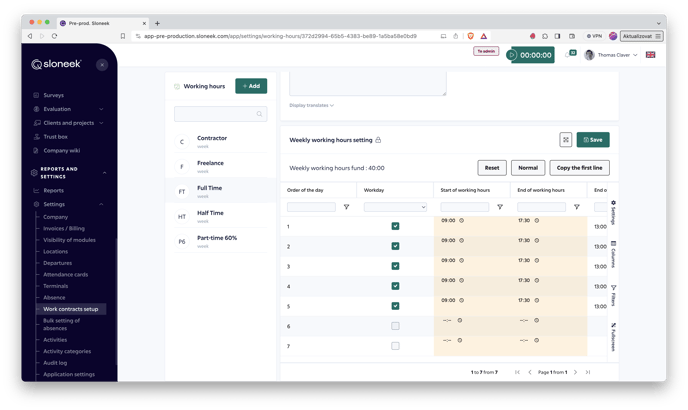
Here, go through all the columns and define the working hours. To simplify your work, there are quick actions on the top right
- RESET - Delete the entire table completely
- BASIC - Sets the most common working hours - Monday to Friday, 8 and a half hours including lunch
- COPY THE FIRST ROW - Takes the Monday setting, and copies it to all other rows
WARNING: Don't forget to save your work times!
Setting annual working hours
Annual timesheets use very similar principles to weekly timesheets. The essential difference is that there is no repetition as there is in the weekly time. In an annual definition, you simply define a specific working time for each specific day of the year. You can therefore have completely individualised working hours that already take into account public holidays and weekends.
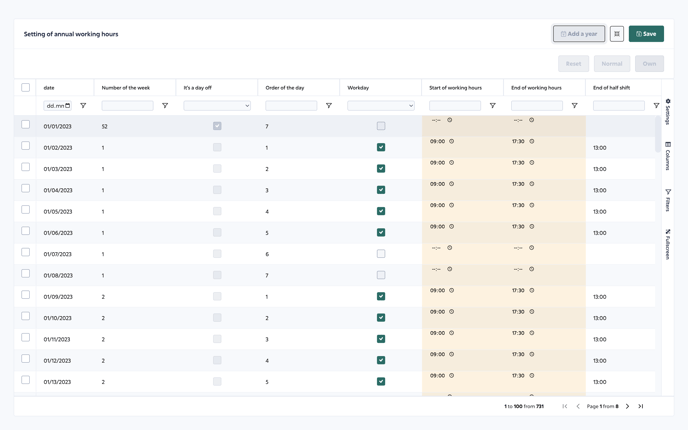
A significant difference from the weekly cycle is how the application accounts for public holidays. On a weekly cycle, it is of course not clear whether there will be a public holiday on a particular day. In the case of a user who has a weekly cycle, works Monday through Friday, and a public holiday occurs on a Wednesday, for example, even if the user has Wednesdays as working days, Sloneek will take the Wednesday with the public holiday as a day of rest in the weekly definition. However, in the case of the yearly definition, the scheduler who defines the working hours sees that there is a public holiday on that particular day (in our case Wednesday), and still schedules a shift for that day, the user should simply have it!
To edit the working times even in the case of the annual definition, click on the "Zoom to full screen"![]() next to the "Save"
next to the "Save" . In this large area, set specific shift times for each individual day.
Here you have the option to filter the days by different criteria, for example you can filter only Mondays (it is the day with the serial number 1), or all even weeks, etc. Once you have filtered the days you want to bulk set, select them by clicking on the checkboxes on the left, and edit the days so selected by clicking on the CUSTOM button at the top right. A window will open in which you set all the times, and click on the SAVE to overwrite these set times in all selected days.
De facto, you can very quickly set up relatively more frequent recurring patterns for several days at once. This can save you a huge amount of time because you won't have to go through all the days one by one and set them up one by one.
You now have Work Time dials that you can set up for specific users of the app.
Tip: You may have also noticed a type of cooperation called Empty. You can use this form of contract for those users who are not employees and do not have standard working hours, do not take absences and only track how much time they actually work through activities.
Assigning working time to a user
You can assign working hours to a specific user on the User Folder, Contract and Payroll. You can set the duration to either a definite or indefinite period.
What to watch out for:
- Without assigned and active work time, a user cannot draw absence events, record attendance, and timetracking!
- Each user can only be assigned one currently valid working hours. Therefore, it is not possible to assign a user two simultaneous working hours. But do not worry, we have got our tricks so let us know if you need in this matter.