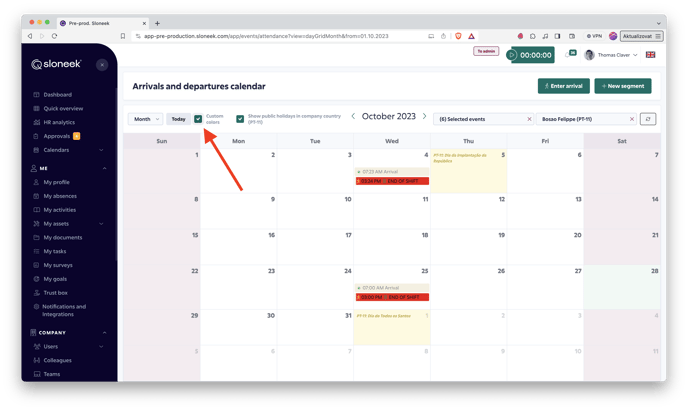
Track the arrivals and departures of your employees. This is a standard attendance system.
Attendance event codebook
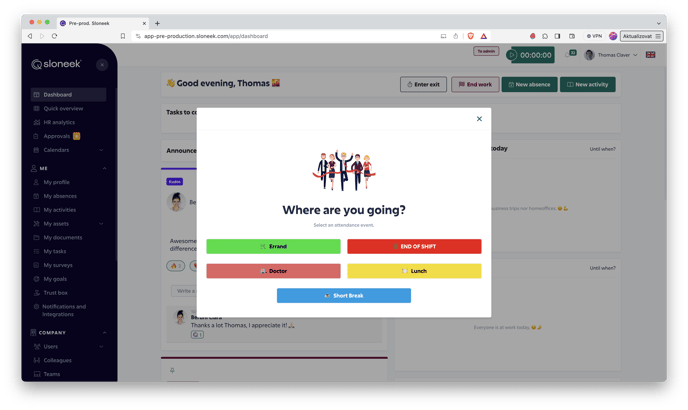
The events that users record through Attendance are configurable in the attendance dials available in Company Settings / Attendance Events.
What you will set up:
-
event name, or the language variant of the event name for all available languages. This allows you to configure attendance to speak to foreign workers in their language (the whole application is of course available in several languages).
-
activate/deactivate an event - If an event is inactive, it will not be visible when you select the event.
-
end of shift marking - An event marked with this flag will be treated as an end of shift
An event marked with this flag will be treated as a shift end. You can only have one of this event type. If you mark another event with this flag, the flag will be removed from the previous event.
-
event type - there are only 2 types
-
At work - The event is related to a work activity ( at the workplace, errand, business trip, customer visit, etc.)
-
Not working - The event refers to non-work activity (end of shift, work interruption, lunch, etc.)
-
-
colour - To better distinguish between the different attendance events, you can change the colors of the buttons that users use to log into attendance. Attendance events in the calendar view will be coloured in the same way.
After setting up the event, don't forget to  your work.
In the Clock-in / out calendar, you can turn on the "custom" colour selection. When activated, the events will be displayed in the colour scheme you define.
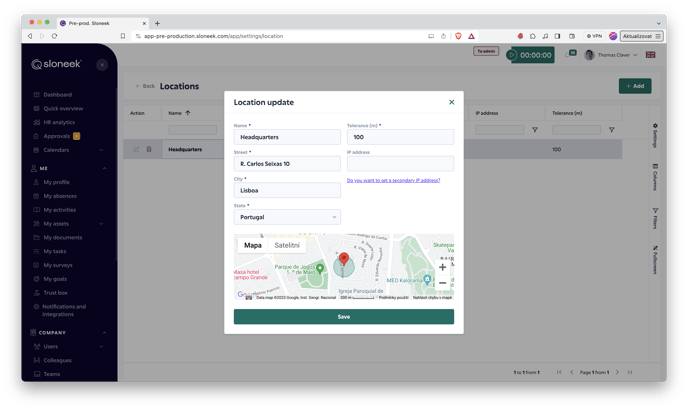
Setting up locations
You enter locations in Settings / Locations.
Locations are physical addresses that are paired with attendance events. If a user enters an arrival or departure within the geographic radius defined in a location, the attendance event is attributed to that location. In the reporting of attendance events, it appears as the name of the location (e.g. Office Prague). If the user logs into the system at a location that does not match the locations entered in Sloneek, it will appear in the report as "off-site" identification.
Because the location is tied to GPS, the user's location may not be accurate at the time of detection if the user is, for example, in a large building, in an underground car park or even in the subway. This needs to be taken into account when setting the distance tolerance of individual company locations.
When setting the tolerance radius (a radius of meters from the exact address of the location), take into account the expected internet and GPS signal coverage. In densely populated locations, 100 m will be sufficient, in areas with lower coverage, add at least 300 m.
The app needs user consent to access GPS locations for proper functionality.
In any case, the app does not track the user's movements, it only records the user's location when they arrive or leave for work as part of their company attendance.
In any case, the app does not track the user's movements, it only records the user's location when they arrive or leave for work as part of their company attendance.
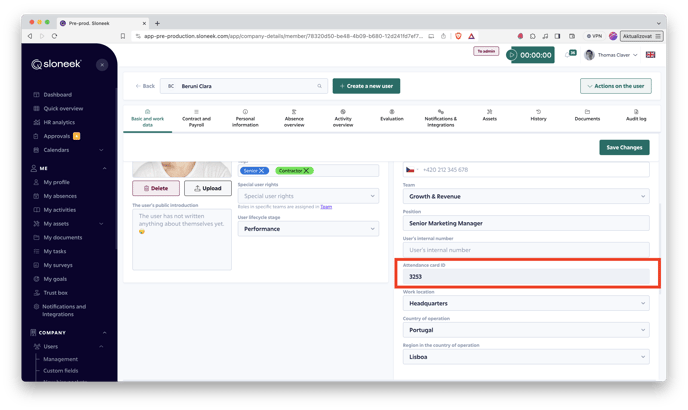
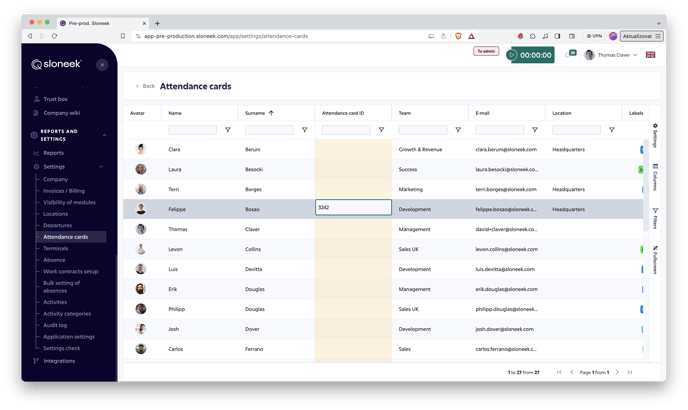
Setting up attendance identification cards
When using attendance terminals, employees are assigned identification cards, both by editing the user profile and through the attendance card report.
The pairing of a user to his/her attendance card (or chip, sticker,...) is done by Admin via the Settings section. The card can be assigned to an employee either
- by editing the employee's user profile, or
- via the report Cards (Settings / Attendance Cards).
If a user's card is changed, their attendance will remain unchanged! So for example, if user loses the attendance card, you can safely issue a new card to the user, their attendance will remain the same and Sloneek will just start using the new card to register Clock-in / out.
Editing a user's profile
You must have a card reader connected to your computer to perform this activity. Read more about accessories for the attendance system here.
In the Users / Management click on edit User and set, change or remove the user's attendance card ID in their profile.
Click in the field to enter the card/chip. Attach the chip and the number will automatically be entered in the field.

Settings via the Cards tab
If you need to change cards for multiple users at once, the best way to do this is to use the report in Settings / Attendance Cards. In the table, the card ID field is directly editable. Just double click on it, change it and click outside the field. The change will be saved immediately.
To automatically enter the card number, click in the card/chip entry field. Attach the chip and the number is automatically entered in the field. It is also automatically saved.
Change card
The administrator can change the user's card at any time. To change a user's card, follow the procedure described above.
When changing the card number, previous attendance will not be affected in any way.
Setting up the attendance terminal
Sloneek's attendance recording terminal is a Thin Client, which can run virtually any operating system and has Google Chrome installed on it.
The terminal is logged in using a unique terminal code that lets the application know which terminal it is, and which company and location it belongs to.
All attendance operations, such as entering arrivals and departures, filling in missing departures, and possibly saving the photo taken when recording arrivals and departures, are instantly synchronized with the Sloneek server.
If the terminal is disconnected from the Internet, a warning message is displayed and the terminal stops recording attendance events until the connection is restored. An entry is made in the audit log about the event.
A constant connection to the Internet is necessary for the terminal to function properly.
For setting up a new terminal in the application, go to the section Settings / Attendance Terminals. Here you have an overview of all existing terminals in your company. You can edit them and of course add a new one by clicking on the "Add".
Enter the name of the terminal, which will then appear, among other things, on its screen visible to all users who go to take attendance. Select a location from the already created location dials (Settings / Locations). Enter the PIN for logging out of the terminal and the unique PIN for logging in.
In order to launch a properly set up terminal on your prefered device (tablet, desk computer etc.), go to https://app.sloneek.com/terminal/.
More detailed guide to set up your terminal can be found here.